“], “filter”: { “nextExceptions”: “img, blockquote, div”, “nextContainsExceptions”: “img, blockquote, a.btn, a.o-button”} }”>
Heading out the door? Read this article on the new Outside+ app available now on iOS devices for members!
>”,”name”:”in-content-cta”,”type”:”link”}}”>Download the app.
I remember the first restorative yoga class I ever took. Mostly because of how pointless I thought it was. As the teacher cued various reclining postures, I kept waiting for the part when we’d pick up the pace. “Aren’t we going to do anything?” I wondered.
Not to mention, I was overwhelmed by the pile of props and felt clumsy in my attempts to put them all in the right places. More than once, the instructor had to untangle me from my yoga strap. Worst of all, as I was forced to confront my unquiet mind in a very quiet room among strangers, I did not feel relaxed. I actually felt even more restless and anxious than usual. I’m embarrassed to admit that I left early and didn’t attend a class like that again for years.
It wasn’t until I learned about the benefits of relaxation in a yoga teacher training that I was inspired to give restorative yoga another try. Guided by supportive teachers who simplified prop set-ups and offered a few different meditations that helped my mind slow down, I found a little bit of stillness. That stillness was actually restorative; it felt like a mini-vacation. “So this is the point,” I thought.
Although I still felt like I was doing, well, nothing, I was armed with the knowledge that “doing nothing” was vital for my own self-care. It was a game-changer to embrace the lesson that not everything that is good for me requires effort.
Why It’s Important to Relax
As students, we’re often more willing to participate in practices when we understand their value. There may be no better way to underscore the benefits of restorative yoga poses than to highlight them as a way to combat stress.
“There is no shortage of stress these days, but our bodies are not designed to be in the stress response chronically,” says Laura Malloy, a yoga therapist, clinical social worker, and director of The Benson-Henry Institute for Mind Body Medicine. “That chronic stress puts a lot of wear and tear on our bodies and can exacerbate health issues,” she says.
The Institute continues the work of Herbert Benson, MD, a doctor who specialized in the crossover between stress and spiritual health. Benson’s best-selling book The Relaxation Response underscores what yoga practitioners have long known: we can “hack” the autonomic nervous system, shifting it from a stressed fight-or-flight mode into the recovery state of rest and digest. The latter state is what Benson referred to as the “relaxation response,” in which the body can restore itself from the effects of stress. That’s exactly the state restorative yoga can help students reach.
“When we practice restorative yoga or other relaxation techniques, our heart rate lowers, our blood pressure lowers and our rate of breathing lowers. This is the opposite physiology of being in the stress response, and it helps our overall health,” says Malloy.
Still, the idea of quieting the mind and body can feel intimidating—and I’m guessing not just for me.
How to Relax
Even if you’re motivated to relax, you may not know how to go about it. Practicing restorative yoga poses is one thing—learning how to cope with a restless mind is another.
“The mind loves a focus,” says Malloy. So it helps to “be intentional about what we’re focused on rather than letting the mind wander into various thoughts. It’s like giving your mind a bone. It gets us off the train of everyday thought and is calming for the mind and body.”
The same techniques won’t work for every student or even every time, so she offers an array of meditative focal points that you can try to help calm your mind during restorative yoga.
1. Mindfulness
Malloy describes mindfulness as “moment-to-moment awareness without judgment.” She says, “I encourage students to release their thoughts and come back to the present moment. Our mind is always wandering, but if we can bring our mind back to the here and now, that helps us lower our stress and feel happier.” In restorative yoga, that could mean simply coming to an awareness of the space where you’re relaxing and the comfortable position you’re in, supported by bolsters. Noticing your breathing can be part of mindfulness, too.
2. Diaphragmatic Breathing
We tend to breathe shallowly when stressed; diaphragmatic breathing ensures you take deeper, slower breaths that soothe the nervous system.
To practice diaphragmatic breathing, tune into the rise and the fall of your breath. It can help to place one hand on your stomach. Allow your breath to expand your belly as you inhale and release as you exhale.
3. Breath Counting
Another way to focus your mind is through what Malloy calls breath counting. “I find it useful to count the exhalations from 10 to 1 and repeat,” she says. This is a method you can practice in any yoga pose, but especially in restorative yoga.
4. Progressive Muscle Relaxation
Similar to a body scan meditation or a yoga nidra practice in which you bring your focus to particular areas of your body, progressive muscle relaxation calls for that same inner awareness—and adds the clenching and unclenching of muscles. For example, you could curl your toes, then relax them; tense your calves, then relax them; activate your quads, then relax them; and so on, working all the way up to tensing and relaxing the muscles in your face.
“Some people find progressive relaxation to be helpful because it exaggerates the tension in the body and then releases it,” says Malloy. (You can also relax each muscle group without clenching it first if you prefer.)
5. Mantra
“Repeating a mantra or phrase can be helpful to quiet the mind and instill relaxation,” says Malloy. You could repeat a positive affirmation such as “I am at peace,” Malloy suggests. (Personally, I like “Today is going to be easy.”)
If there is a Sanskrit mantra that has meaning to you, such as, “Lokah Samastah Sukhino Bhavantu” (“May all beings everywhere know peace”), you could repeat that silently to yourself. You can keep it simple; a one-word mantra like “Om” or “joy” works, too.
6. Visualization
Malloy points out that we often react to imagined stimuli as if they are real, so picturing calming images can help relax our body. “We might imagine being on the beach and tuning into all of our senses—seeing the waves, hearing seagulls, smelling the ocean air, feeling the sun,” she says.
7 Beginner’s Restorative Poses
You can practice this restorative yoga sequence in any place where you feel safe and comfortable—it doesn’t have to be a yoga studio. If you are hesitant to commit to a group class, exploring stillness at home can be a valuable way to test the waters. Try to make your space as distraction-free as possible–I will say from experience that people, pets, and phones are not always super helpful for relaxation, but you be the judge of how much you can set aside.
You can set yourself up on a yoga mat, a rug, even in bed. Although restorative yoga is often associated with an abundance of props, that’s not essential. Standard props include a bolster, two blocks, and a blanket, but you can easily swap in bed pillows or couch cushions, small stacks of books, and a blanket or towel.
Remain in each pose for five minutes–or however long you like–or can stand. For me, each pose gets better as the minutes go by and my initial restlessness subsides. If you find your mind wandering, guide it back to the relaxation technique suggested or another one you like.
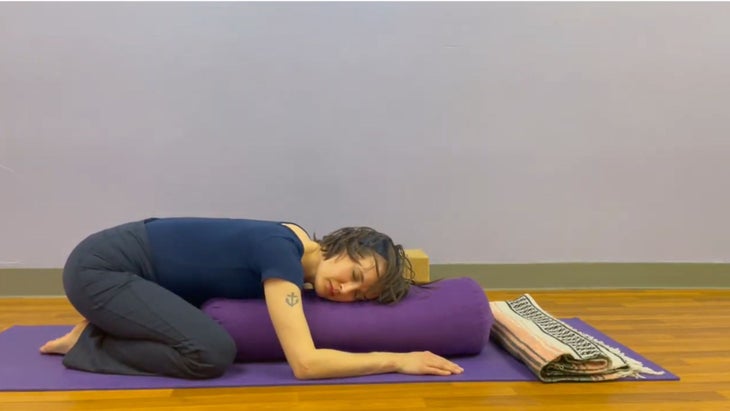
1. Supported Child’s Pose (Balasana)
Place the bolster or a stack of pillows lengthwise on the mat. Come to your hands and knees on the mat with your knees on either side of the bolster or stack of pillows. Draw your hips toward your heels; then lower your belly, chest, and forehead against the bolster and lower your elbows and forearms to the mat in Child’s Pose. Stay here or turn your head to one side. ( Turn it to face the opposite direction about halfway through the pose.) Some people like placing a folded or rolled blanket under their forehead, knees, or ankles. Let your weight sink against the props.
Relaxation technique: Practice mindfulness by noticing your surroundings. What do you hear around you? What do you taste and smell? What sensations do you feel on your skin? Perhaps the touch of air, your clothes, or the gentle pressure of the bolster beneath you. Then notice what’s going on inside your body and mind. Acknowledge any thoughts that are taking you out of the present moment, and get curious as to how it would feel to let them go.
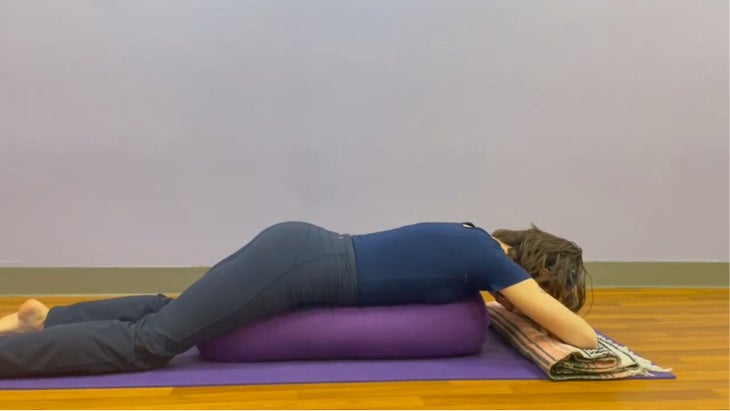
2. Supported Crocodile (Makarasana)
Place the bolster lengthwise on the mat in front of you. Lower yourself, belly down, onto the bolster or stack of pillows. Rest your legs straight behind you, hip-distance apart or wider, and stack your forearms on a folded blanket or towel at the end of the bolster. Rest your forehead on your hands. Some people like to place another blanket underneath their forearms, knees, or rolled under their ankles. Let your weight rest against the bolster.
Relaxation technique: Practice diaphragmatic breathing. Notice whether you can feel your belly move in and out with each breath. In fact, the effects of the breath are body-wide: can you feel a slight expansion of your entire body as you inhale, and a gentle inward-drawing as you exhale?
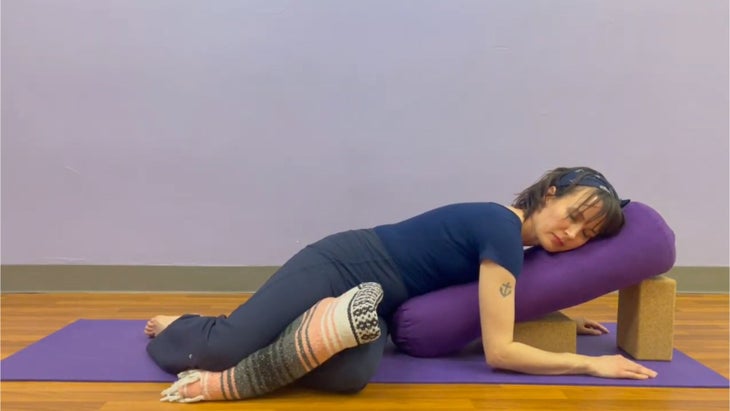
3. Supported Twist (Salamba Bharadvajasana)
Arrange the pillows or bolster so the far end is on top of a stack of books or a block. Sit with your left hip against the bottom of the bolster with your knees bent, placing a folded blanket between them if you like. Turn toward the bolster and place your hands on either side of the it before you slowly lower your belly and chest onto the support. Rest your hands and forearms on the mat. For more of a stretch, turn your head to the right; for a gentler posture, keep your head turned to the left toward your knees. Place a blanket underneath your bottom hip if it’s more comfortable. Breathe here, relaxing the weight of your arms and shoulders; then switch sides.
Relaxation technique: Here, you could experiment with breath counting. As you exhale, say, “10” to yourself. On your next exhalation, say “9” to yourself, and so on, counting your way down, then repeating the process. Don’t worry if you lose your place—that often means you’re starting to relax! Simply start over at ten and count down again.

4. Supported Fish Pose (Matsyasana)
Sit at the base of the bolster, still resting on props at the far end, facing away from it. Lie back on the bolster and straighten your legs. Or bend your knees and place your feet flat on the mat if you’re tending to lower back relief. Place your hands on your belly or alongside you on the mat in Fish Pose. You could use blankets to pad your hands and forearms, or drape one across your belly, making it easy to feel the movements of your breath.
Relaxation technique: Try letting go of tension progressively—muscle group by muscle group. If it helps to clench and relax your muscles, do that. Or simply bring your attention up and down your body and imagine releasing any tension.
5. Supported Reclining Bound Angle (Supta Baddha Konasana)
From Fish Pose, bend your knees and bring the soles of your feet toward each other, making a diamond shape with your legs. If it’s more comfortable, place a blanket underneath your head, sitting bones, or knees in Reclining Bound Angle Pose. Relax your legs and rest your hands alongside you on the mat with your palms facing up.
Relaxation technique: Choose a word or phrase to focus on with each breath. Repeat it the entire time you’re in the posture.
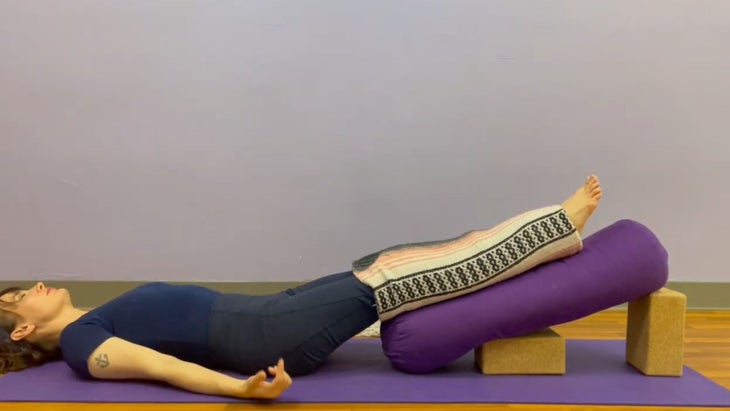
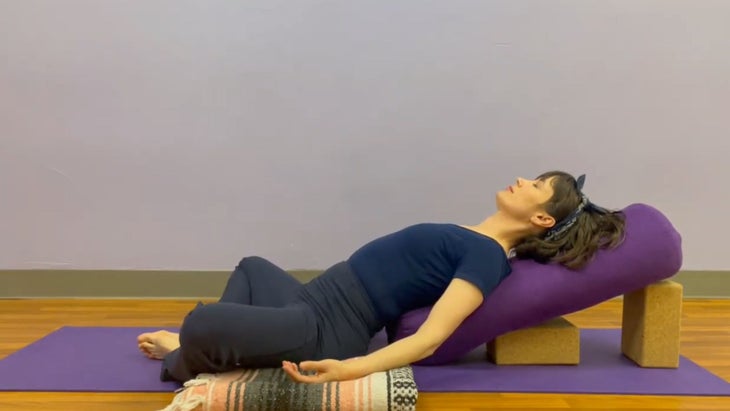
6. Legs Up the Bolster (Viparita Karani)
Lie down on your back with your legs reaching up the propped up bolster. Wrap the sides of the blanket over your legs. You may want a blanket underneath your head or even one rolled up underneath your shoulder blades in this variation of Legs Up the Wall. Legs not staying on the bolster? Loop them with a strap or belt.
Relaxation technique: To practice visualization, imagine a place to which you’d like to guide yourself, where you know you could feel perfectly safe and relaxed. What is it like there? What sounds are around you? Is the air moving, or still? What does the light look like?
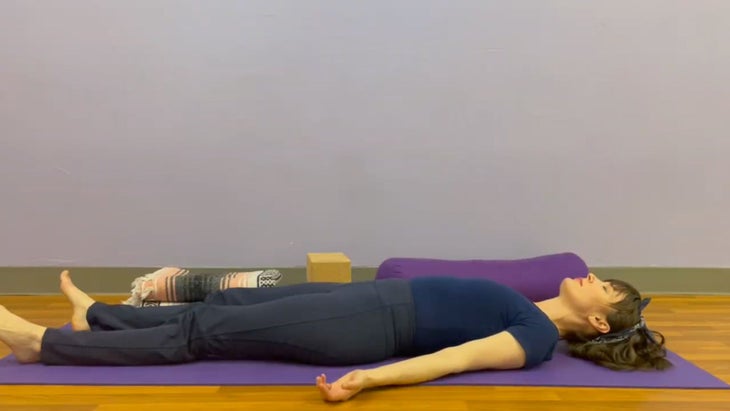
7. Corpse Pose (Savasana)
Typically practiced lying flat on your back with your arms out to the sides, Savasana doesn’t require props. Practice this way if it’s comfortable. If not, place a bolster, pillow, or rolled blanket underneath your knees. You might be surprised how much more you can relax with just a little bit of support.
Relaxation technique: Notice what relaxation feels like. Does it bring up any other feelings? How would you describe it? Does it have a color or a texture? Is it located in one part of you, or does it seem to be sprawling throughout your body—even beyond your body, softening your edges?
Even if you are new to restorative yoga, there may be something familiar about the feeling you’ve tapped into by the end of practice, as if some part of you is, and has always been, an expert in relaxation. Perhaps you can keep a trace of this ease even as you, very gently, rise to any comfortable seat that works for you and take a moment to reflect on which relaxation techniques worked best for you. Use them to return to a state of relaxation whenever you want: it’s already yours.


")
