“], “filter”: { “nextExceptions”: “img, blockquote, div”, “nextContainsExceptions”: “img, blockquote, a.btn, a.o-button”} }”>
Heading out the door? Read this article on the new Outside+ app available now on iOS devices for members!
>”,”name”:”in-content-cta”,”type”:”link”}}”>Download the app.
In Yoga Journal’s Archives series, we share a curated collection of articles originally published in past issues beginning in 1975. These stories offer a glimpse into how yoga was interpreted, written about, and practiced throughout the years. This article first appeared in Yoga Journal in February 2012. Find more of our Archives here.
Some yoga poses can come to you quickly and relatively easily. Other poses can feel as though they require every ounce of your stamina even after years of practice. And then there’s Chair Pose. For most of us, it falls into a category of its own of poses that look deceptively straightforward yet require tremendous stamina in body and mind.
Another challenge of Chair Pose is its simple form offers little glory. For all the effort it requires, you won’t end up with your leg wrapped behind your head or in some other fancy position. And that’s largely the point.
In Sanskrit, the word for dedicated practice is abhyasa. It is the act of consistently making an effort to reach a goal. In your yoga practice, this implies discipline, but it is also a movement toward effortlessness that arises when you let go of the outcome. If you stay interested in the practice itself rather than the goal, then at least some movement toward effortlessness will happen.
It can be frustrating while you’re in it, but in the end it teaches you the determination you need to meet a challenge and the perseverance to return to it repeatedly over time. Perhaps no other pose produces more frowns and even groans among students, yet when I encourage them to persevere, they tell me they’re glad that they did.
Chair Pose Benefits
Similar to other types of squats you might practice at a gym, Chair Pose (Utkatasana) is a full-body exercise that teaches you to handle many different demands at the same time for what feels like way too long. Your effort is rewarded with numerous benefits, including:
- Strengthens your quadriceps and stabilizes your knee joints
- Engages your ankle muscles
- Activates your arm and shoulder muscles
- Helps increase your breathing capacity by stretching the muscles between your ribs
- Strengthens your core muscles
- Improves posture
- Teaches you discernment regarding your current needs
Challenging poses, such as Chair, draw your awareness to where you need to strengthen the parts of your body that demand strength, stamina, or both.
How to Make Chair Pose Easier
Isolating the different demands of Chair Pose and practicing just the upper or lower body at a time can help you learn safe alignment and make the pose feel more doable.
Although Chair Pose demands some measure of flexibility in the shoulders as well as stability in the core and strength in the legs. Working on developing these can make your experience of Chair Pose entirely less frustrating.
 (Photo: Andrew Clark)
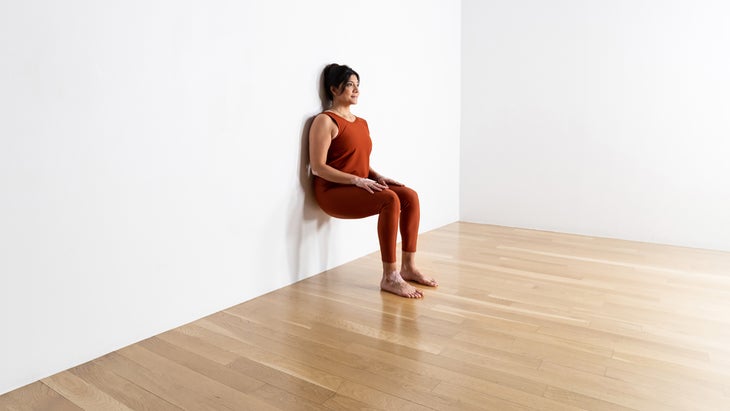
1. Practice Chair Pose With Your Lower Body
First, work on bending your knees and shifting your weight into your heels.
The instructions below help you do exactly that by practicing the pose against a wall, which takes some of the intensity off your legs, although you can rely on the same cues and technique as you practice it away from a wall on the mat.
How to:
- Stand with your back against a wall and your hands on your hips.
- Step your feet about 2 feet away from the wall and bend your knees, as though you’re sitting in a chair with your ankles stacked beneath your knees.
- As you exhale, press your heels strongly into the floor until you feel your calves and hamstrings engage. Maintain the strength in your legs and observe the parts of your body making contact with the wall. The backs of your sit bones, your ribs, your shoulders, and your head will touch the wall. Your lower back and neck will tend to curve away from it.
- If you feel your hips tipping forward away from the wall, exaggerating the curve in your lower back, use your hands to redirect your hip points into a more neutral alignment. Use just the right amount of effort. Don’t go so far as to tuck your tailbone, which will flatten your lower back.
- Your thighs are probably burning by now, but try to stay strong and maintain this alignment for a few breaths. Then inhale as you straighten your legs and return to standing.
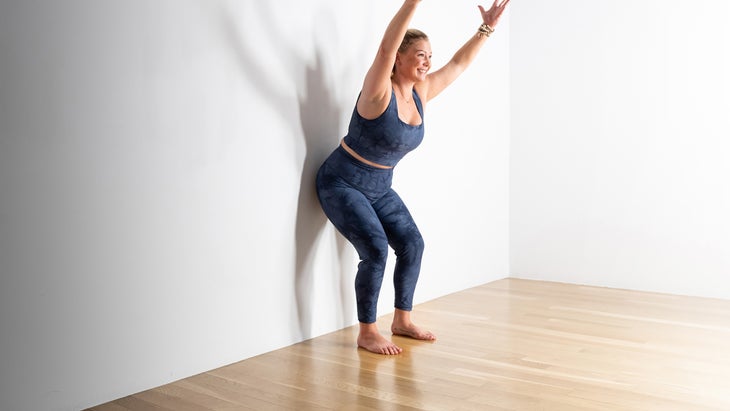
2. Practice Chair Pose With Your Upper Body
Next, become more familiar with the arm positioning of Chair Pose. As you reach up and back with your arms alongside your ears, there can be a tendency to exaggerate the arch of the spine. You can train yourself to engage your core muscles and resist that compensatory arch in the back by recalling what it felt like to practice Chair Pose against the wall.
How to:
- Stand with your back to a wall. Step your feet together or keep them a few inches apart.
- Notice that your shoulders and upper back are touching the wall. Your lower back and neck are not; these are places where your spine naturally curves toward the front of the body.
- Work to maintain, but not exaggerate, these natural curves as you lift your arms alongside your ears and shoulder-width apart. Notice that when you reach your arms, your ribs and spine will want to follow the arms, jutting forward and producing discomfort in the lower back. Engage your core muscles to stabilize yourself as you draw your lower ribs back toward the wall. Experiment with how high you can take your arms overhead while keeping your ribs in contact with the wall behind you.
- Take at least 5 full breaths here, expanding your chest and grounding down through your legs. As you exhale, lower your arms and relax.
3. Come into Chair Pose With Your Entire Body
Finally, unite the upper and lower body portions into a cohesive and powerful pose. Again, you can practice this against the wall or away from it. The more deeply you bend your legs, the more you’ll need to lift your lower belly to avoid overarching in your lower back.
How to:
- Stand with your weight evenly distributed between your feet. Lift your arms overhead and shoulder-width apart.
- Bend your knees, keeping your weight in your heels. Recreate the sensation you experienced with your back against the wall, drawing your navel toward your spine and reaching through your arms. Press your heels firmly into the floor. Gaze at a fixed point on the floor a few feet in front of you. Breathe here.
- As you inhale, press into your feet to stand up. Straighten your legs and lower your arms. Pause and feel the effects of this powerful pose.
Tips for Chair Pose
Utkata means “powerful” or “fierce,” and while this pose calls for physical power in the body, it also requires your awareness of subtle details. The following adjustments can help make Chair Pose feel even more manageable:
- Feet
Practicing with your feet together will help engage your inner thigh muscles. If you feel unsteady, step your feet hip-width apart for increased stability. - Arms
If you feel winded or your shoulders ache, try practicing with your arms straight in front or you or at your sides rather than overhead. - Knees
Shift your weight back toward your heels to help keep your knees safe. - Chest
Lift your chest away from your thighs. If you’re practicing at a wall, it helps to imagine leaning your upper back against the wall behind you. - Neck
Keep your cervical spine rather straight rather than tilting your head back to look up. Try resting your gaze on the floor several feet in front of you. - Jaw
Notice if you scrunch your brow or clench your jaw. If so, relax them. - Breath
If your breathing becomes labored, lengthen your exhalations to help calm your body and mind.
This article has been updated. Originally published February 15, 2012.

")


