Published December 10, 2025 01:00PM
In Yoga Journal’s Archives series, we share a curated collection of articles originally published in past issues beginning in 1975. These stories offer a glimpse into how yoga was interpreted, written about, and practiced throughout the years. This article first appeared in the July-August 1983 issue of Yoga Journal. Find more of our Archives here.
Although it’s not considered a beginner pose, Handstand can teach the experienced yoga student a lot about the practice of yoga. Adho mukha means face down, and vrks means tree—so Handstand is called “face down tree,” implying that the arms and shoulders become like the roots of a tree, offering support and nourishment to the structures above.
Benefits of Handstand
This pose offers the benefits of inversions, such as increased circulation to the upper body. Like the other classical inverted poses of Sirsasana (Headstand) and Sarvangasana (Shoulderstand), it also teaches the student poise. The nervous system controls movement through learned patterns in which groups of muscles and joints act habitually to produce desired results. In turn, this movement produces feedback, which informs the nervous system where one is in space in relation to gravity. When the body is upside down, or in other unusual positions, the nervous system receives new input. Therefore, it must adjust constantly to the new demands gravity is placing upon the body in order to avoid injury and to maintain the position.
Teaches Focus
Placing the body upside down requires concentration and awareness and teaches the student to maintain inner poise—the ability to remain in touch with one’s inner equanimity in the midst of outer turmoil and in the midst of constant adjustment. For many, the practice of Adho Mukha Vrksasana creates an outer turmoil of insecurity and fear; it is the perfect opportunity to learn the value of maintaining one’s connection with the inner life. One way to do this is by maintaining the regularity of the breath in the pose.
Builds Strength
Another benefit of this pose is the strength it creates in the muscles of the upper extremities and trunk. Handstand requires strength in the wrist extensors (those muscles just above the back of the hand but below the elbow), in the triceps (in back of the upper arm), in the pectorals (upper chest muscles), and in the many shoulder and back muscles used to stabilize the scapulae (shoulder blades) during the pose. While standing, support of the body is provided by the large and quite strong muscles of the legs, thighs and buttocks. By contrast, the muscles of the upper extremities have much less muscle mass with which to provide strength, and the shoulder joint is less stable, mainly because of its shallowness.
This allows more freedom of movement in the shoulders than in the hips, but it makes it more difficult to control the movement. The hip joint is just the opposite: bony structure and large muscles provide more stability but less mobility.
One of the lessons to learn in Handstand is how to balance strength and flexibility. Adho Mukha Vrksasana invites strength to the upper body, which then allows a more effective use of the arms, rather than the back, when performing daily tasks such as lifting heavy objects. Because of this strengthening, Handstand can help to prevent back injury.
Offers a Lesson in Resilience
Finally, Adho Mukha Vrksasana demonstrates the importance of difficulty in the practice of yoga. In the same way that Handstand is difficult for the arms and thereby can strengthen them, encountering psychological and emotional difficulty during one’s practice can release blocks to the true expression of yoga. The student with this attitude will welcome difficulty, whether it be the difficult asana or the difficult personal situation because it is an opportunity to practice yoga with more clarity.
The challenge of a difficult asana is direct and immediate; it becomes clear where one must release and where one must be strong. When one’s emotional stability is threatened, for example, one can likewise learn where attachments and blocks are, and release them. Thus, difficulty is necessary in yoga not because it is an obstacle, but because it offers an opportunity to improve, to release, and to transcend our limitations. And that transcendence of limitations is at the core of yoga.
How to Practice Handstand
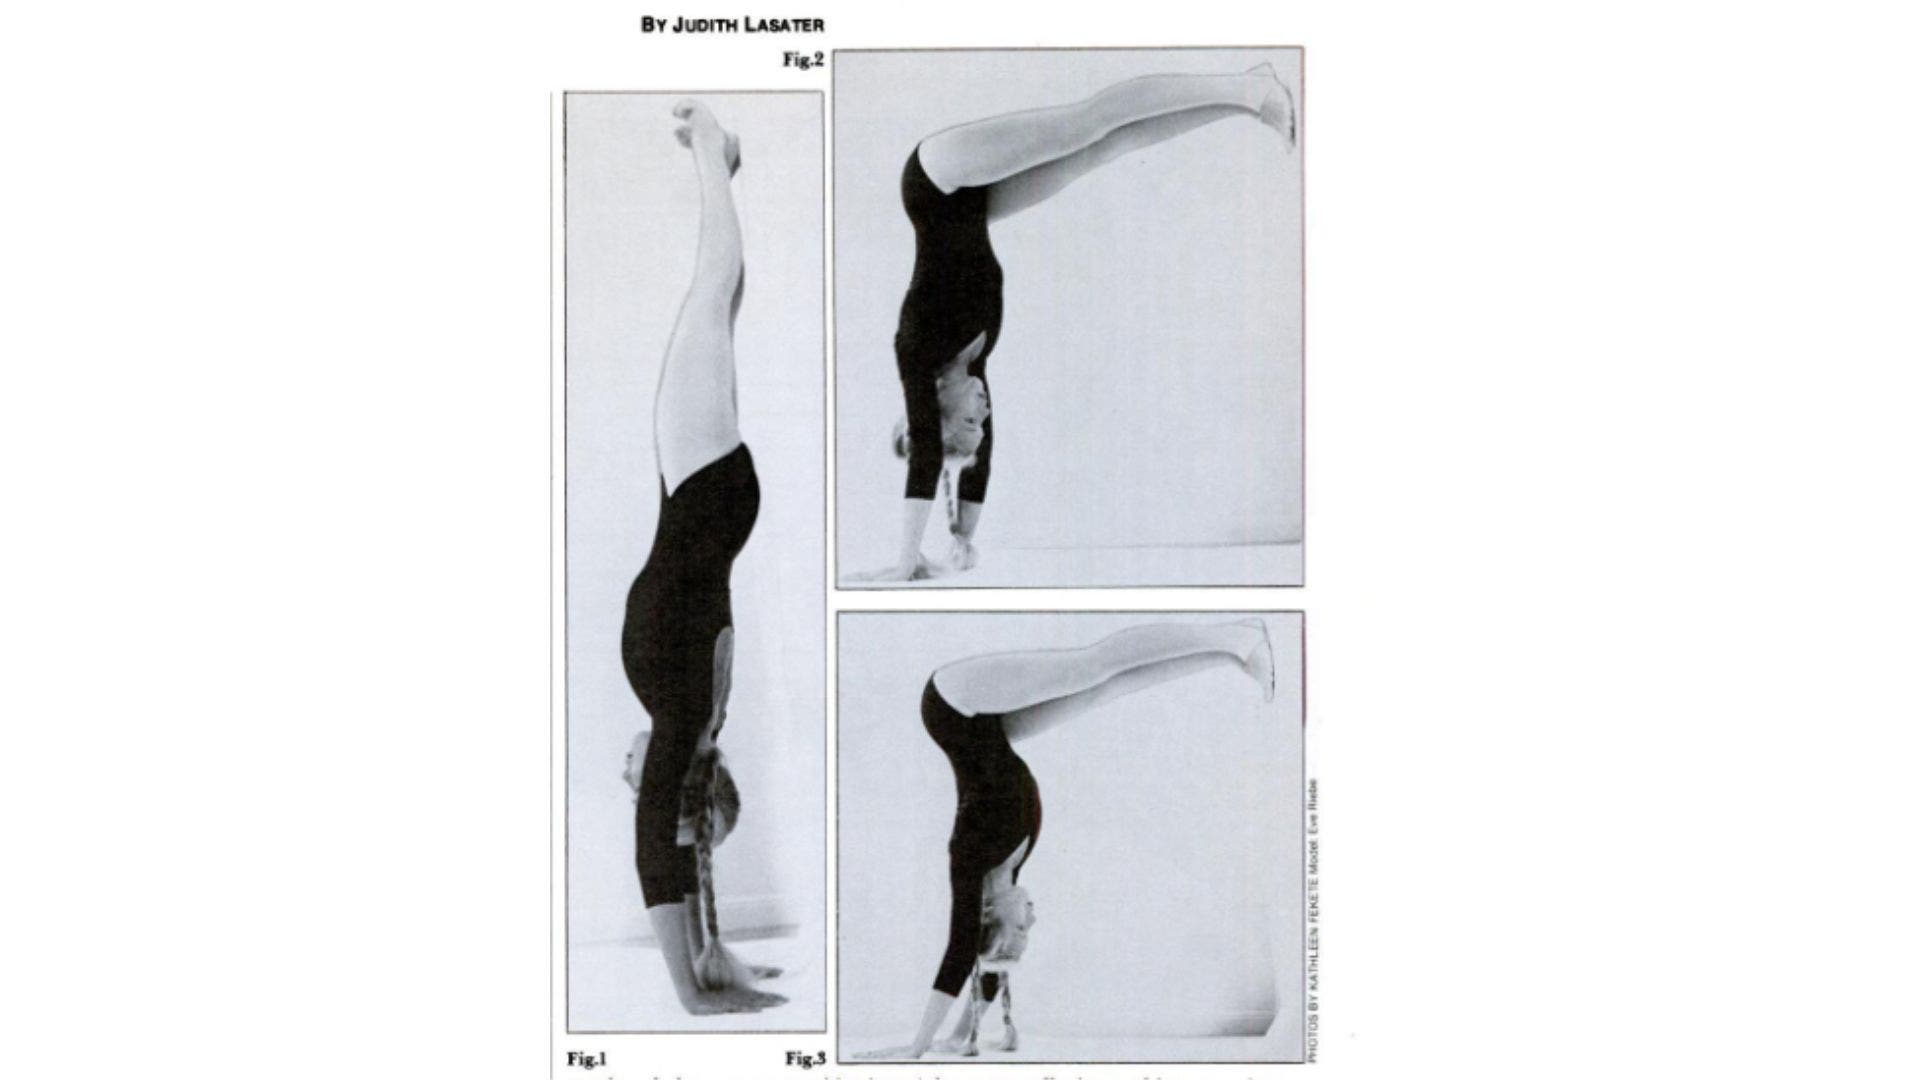
In order to practice Adho Mukha Vrksasana, the student must have confidence in the strength of the arms. After practicing yoga regularly for some time, they may try walking the feet up the wall in a backward Handstand (Figure 2). This allows the student to get upside down and begin to strengthen the arms. Be careful to keep the spinal column straight, not collapsed. The front lower ribs must be held in, not pushed out as in Figure 3, where the lumbar (lower) back is overarched, and strain is being created. (In the beginning it is better to practice this preparatory pose with the help of a teacher to provide support.)
For some students, the preparatory pose will be simple, and they can progress to the next stage immediately. But others should practice at this level for some time. As in all aspects of yoga, progress is totally individual and each student must move at their own speed. The student who is overly anxious to progress to the next stage should examine this attitude and learn more patience in practice.
To begin practice of full Handstand, place the hands six inches from the wall, with the tips of the fingers pointed directly toward the wall. Place one foot forward, with the weight resting on the ball of that foot. Place the other foot back 18 to 24 inches, depending on the length of the legs. The forward leg, nearest the wall, is the “push” leg and the other is the “swing” leg. Remember to take the weight as far forward as possible over the fingers to minimize the backward and forward movement of the shoulders during the process of going up. Initially, keep the head up and look toward the wall. Later, the head may be dropped during the pose and while going up, but in the beginning one should lift the head to prevent the collapse of the elbows.
With an exhalation, push with the push leg and swing up with the swing leg. Push firmly with the hands against the floor; keep the breathing even and come down before strength is exhausted so that the descent can be controlled. Repeat. Gradually work up to holding the pose for a minute. Be careful not to overarch the lower back or to tense the neck. The body should be in a straight line as in Figure 1. Do not overlook the importance of the lifting action of the legs. This takes some of the work away from the arms and makes it easier to hold the pose. Reach upward as do the branches of a tree, using the upward energy of the lift of the legs and feet.
In addition to strengthening the arms, this pose strengthens the shoulders and wrists and expands the chest. It should not be practiced during the menstrual period or for several weeks postpartum. Caution should also be exercised by those with high blood pressure or detached retinas and by pregnant women. In such cases, seek the aid of a competent teacher.
A Note to Teachers
If you are assisting someone with coming up into Handstand, stand between the student and the wall, and slightly to the side. Be extremely careful never to reach across the student’s body to catch the leg on the opposite side.
Always catch the leg nearest you first to avoid being kicked in the head. If you wish, support the student with your knees under their shoulder. Again, this should be the shoulder nearest you. This support gives confidence and keeps the student from collapsing the arms or hitting the wall with the head.

")


