“], “filter”: { “nextExceptions”: “img, blockquote, div”, “nextContainsExceptions”: “img, blockquote, a.btn, a.o-button”} }”>
Heading out the door? Read this article on the new Outside+ app available now on iOS devices for members!
>”,”name”:”in-content-cta”,”type”:”link”}}”>Download the app.
Yoga Journal’s archives series is a curated collection of articles originally published in past issues beginning in 1975. This article first appeared in the January-February 1996 issue of Yoga Journal.
When I mentioned to my wife that I was going to write on Chair Pose, her immediate reaction was, “Oh, I hate that pose”—an attitude that many students share—so we might also call it the Difficult Posture or perhaps the Posture That Makes Me Furious.
Though there are as many asanas as there are species of living creatures in the universe, the old hatha yoga manuals report there are just 32 that are beneficial for humans, and Chair Pose is included among them. Chair is essentially a half-squat, or a half-stand: The feet are flat on the floor, the shins are angled forward about 45 degrees over the feet, the thighs are almost parallel to the floor, and the torso (though it’s tilted slightly forward from perpendicular) stretches up and back with the arms reaching upward.
We don’t often think about our relationship to gravity: Like all the fundamentals of our existence, gravity is pretty much taken for granted, though we might occasionally rail against its merciless grip on our bodies. But Thomas Hanna points out that life, far from being dragged down by gravity, uses its energy as an evolutionary springboard; it is, he writes, a “supportive force” that frees all life to develop and advance, from the oceans onto land, from land into the air and, I suppose, beyond the Earth to other alluring worlds.
We’re able to stand up to gravity, of course, because we have a sturdy interior chassis, a skeleton, that’s designed to bear and control our weight. Our bones separate and rig our muscles to maintain their balanced tone and skillful action.
Gravity and Alignment
But to do this competently, the bones must be properly aligned with one another in the field of gravity. Misaligned bones are poorly suited to carry weight, and so muscles are compelled to brace and stiffen against the now destabilizing pull of gravity. This combination of misalignment and inflexibility restricts the range of our movements and makes even the smallest gesture tiring, upsets our sense of equilibrium and grace, and provokes those nagging aches that are such a “pain in the neck.”
Any asana, even one as seemingly uncomplicated as Mountain Pose (Tadasana), will reveal almost immediately if the bones are aligned with gravity or not. Many students believe they’re unable to sustain certain postures over time because they lack muscular strength, and there may be some truth in this perception. But the deeper cause of their perceived weakness—the quivering muscles, profuse sweating, labored breathing, or no breathing at all—is the misalignment of the bones.
Since there are over 200 bones in our body, I’ve picked one bone, or more specifically, one part of one bone, to focus on. This is the ball-shaped head of the thigh bone (femur), which is the longest, largest, and strongest bone in the body. The femur head is firmly nested in the cup-shaped socket of the pelvis (the acetabulum, or “vinegar cup”) to form the hip joint.
We’re going to work with the femur head in Chair Pose (Utkatasana). The translation of Utkata is not “chair,” however, but “excessive, difficult; exceeding the usual measure; furious; superior, high; proud, haughty.” So Chair Pose is literally the Superior or High Posture.
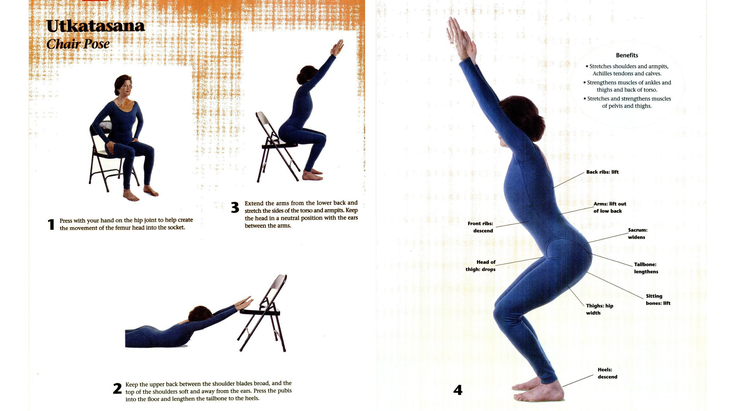
The pose stretches the shoulders and armpits and the Achilles tendons and calves; it strengthens the muscles of the ankles and thighs, and the back of the torso; and it stretches and strengthens the powerful crouch-and-spring muscles (like the psoas) of the pelvis and thighs.
Be cautious in Chair if you’re tight in the groins and have problems with your knees or lower back. Modify the posture: Elevate the heels on a support; bend the knees only slightly; and keep your hands pressing on the top thighs (as I’ll explain below), not raised overhead. If you experience any pain in the knees or back, do not perform Chair until you’ve consulted with a qualified teacher.
Warming Up for Chair Pose
I want to create a certain sensation in the femur head, but it’s not easy to do it directly without some experience of it. So we’ll approximate the sensation somewhere we can get in touch with quite easily—our hand—and then transfer that sensation to the femur head.
Cradle a small, heavy object—preferably ball-shaped (I use a crystal ball about two-and-a-half inches in diameter—in the palm of your non-habitual hand. Hold it steady for a couple of minutes. The contact of ball and hand is double-edged:
You can feel the ball’s mass and the muscular effort needed to push against it, or the pressure of the ball on the palm. Recognize that gravity is trying to pull the ball through your hand to the center of the Earth. Then heft the ball up and down: notice how light it feels on the up-swing, and how heavy it becomes on the down. Store these sensations away for the next few minutes.
You’ll need a chair, a block (or a three-to four-inch-thick book), a 10-pound sand bag (if you have one), and a blanket for the following exercises. First we’ll locate and work with the femur head.
Sit near the front edge of the chair seat, thighs parallel and hip-width apart, heels below the knees. Place the inner edge of your right hand (the thumb, web, and index finger) over the right groin (just where the thigh and pelvis meet), thumb on the inner thigh and the fingers splayed along the outer hip (Figure 1).
Swing the thigh slowly up and down a few times, and notice a bulge of muscle underneath the thumb when the thigh lifts: Just below this bulge is the site of the hip joint. Spend a few minutes and wave the thigh around—try writing the alphabet with an imaginary pen tied to your knee—to get a handle on how the ball of the femur rolls around inside the socket. Repeat on the left.
With both feet on the floor again, retrieve the sensation of the ball-in-palm experiment and shift it to the hip joint: Pretend that the femur head is the ball, and the socket is the palm. Let the head sink, under the influence of gravity, into the “palm” or bottom of the socket. To encourage this movement, press your inner hands onto the groins, or lay the sand bag across the topmost thighs. Sit quietly, eyes closed, with awareness on the groins, lower belly, and breath.
Press the inner hands on the femur heads, and get ready to stand by leaning the torso slightly forward from the hip joints, not the waist. Exhale, lift off the chair, and slowly straighten the legs. It helps me to imagine that I’m being pried off the seat with a crowbar, which is boosting my sitting bones up as the femur heads continue to go down. It’s also important to drag the coccyx behind, as if it’s an alligator tail draped over the back of the chair seat. Just remember, though, not to tuck the tail; you’re an alligator, not a scolded dog. Once standing, hold the femur heads, at least in your imagination, back and down in the sockets. Keep the thumbs in place.
Next we’ll sit down again. We usually do this by simply bending the knees and depositing ourselves on the seat. But this time, I’d like to sit with a different emphasis and reverse the strategy we employed to stand: Exhale, give the femur heads over to the lure of gravity and, as they drop toward the floor, allow the knees to bend.
As the femur heads descend, imagine that the crowbar is reluctantly letting the sit bones down. Lengthen the torso and spine up, as if the top of your breastbone (sternum) is suspended by a rope from the ceiling. Continue with this exercise until you can transition smoothly from sitting to standing and back to sitting again with the femur heads trailing the former movement and leading the latter.
Then try a second exercise which will widen the back of the pelvis to release tension in the lower back, stretch the back of the legs to help the half-squat, and activate the inner thighs to help the legs support the posture. Stand with the balls of your feet on the sandbag (or thickly folded blanket), heels on the floor, and the block between your thighs, an inch or two below the bottom of the pelvis.
Set your inner hands on the sides of the top rim of the pelvis, thumbs pointing to the sacrum, index fingers in contact with the bony hip points. Spread the buttocks away from the sacrum and, at the same time, press the hip points toward each other. Then hug the block with the inner thighs—be sure to keep the outer hips below your palms soft—and think of drawing the inner groins, just above the block, up into your pelvis. Exhale, and fold into a Standing Forward Bend (Uttanasana) for a few minutes.
If the stretch in the back of the legs is too intense, wiggle off the lift and stand flat on the floor. To come up, bend the knees slightly and, dropping the alligator tail to the heels, curl the spine up one vertebra at a time, head drooping until the very last.
The action of the femur heads, assisted by gravity, will anchor Chair Pose to the ground and provide, at the same time, a platform from which the spine and arms can reach. The following exercise will prepare us to work with the upper body in the posture.
Lie prone on the floor (with a blanket to pad your ribs and pelvis, facing the chair seat. Position the inner wrists against the front edge of the seat, near the corners (so the hands are as far apart as possible), palms off the seat (Figure 2). Push the chair away until the arms are straight. If the shoulders hurt, pad the front rung of the chair and put your wrists there. (If the chair doesn’t have a rung, find a lower support, like a foot stool.)
Broaden the back of the pelvis and extend your alligator tail toward the heels to protect your lower back. Be sure also that the lower front ribs don’t poke into the floor: Every now and then, inhale, raise your torso up a bit and, aiming the top of the sternum toward the chair seat, release the front ribs toward the pelvis, and return to the floor with a soft belly.
Take the back ribs, though, away from the pelvis, and imagine the arms are rooted deep in, and grow out of, the lower back. Stay with the stretch along the side ribs and through the armpits for a few minutes. Don’t forget that each armpit is bordered by two muscles, the pectoralis major in front and the latissimus dorsi in back, which should be stretched as evenly as possible.
How to Practice Chair Pose
Sit on the chair as you did at the start of the preliminary exercises, then slide the feet close to the chair without taking the heels off the floor. This will angle the shins relative to the floor, so that the knees are over, or extended beyond, the toes. If you’re tighter in the calves, you might want to practice for a while with your heels elevated.
Put your thumbs over the hip joints, exhale, and lay the torso down on the thighs. Use the pressure of your thumbs, the weight of your pelvis and, most of all, your budding friendship with gravity to move the femur heads down. Lift the hip points over the thumbs and lengthen them forward, away from the groins, and drag the navel away from the pubis.
Inhale and extend your arms forward, shoulder-width apart, palms facing, and thumbs snuggling against the index finger sides of the hand (Figure 3). Drive the heels into the floor, exhale, and begin to stand as you did earlier, femur heads sinking, sitting bones lifting, but stop when the sit bones are a few inches off the seat.
With a long spine, rock the pelvis backward and try to bring its upper rim parallel to the floor—it won’t happen, but try anyway. If the thighs want to spread apart, pretend that you’re squeezing the block; if they threaten to liquefy and petulantly lift up, ask the “guru” to please pull down harder on the femur heads.
As you shift the pelvis into place, take the arms up and back and repeat what you did during the arm exercise: Hang the lower front ribs from the height of the top sternum, stretch the armpits evenly, and extend the arms from deep inside the lower back. Tight-shouldered people should keep the arms shoulder width; others can flatten the palms together, and reach up through the tips of the pinkies.
Imagine that your body is like one of those old-fashioned spyglasses from a pirate movie, the kind that telescopes open and shut. Elongate your body in segments: the pelvis from the femur heads, the back ribs from the pelvis, and the arms from the back ribs.
At this level, stay in the posture for 20 to 30 seconds, breathing evenly, then with an exhalation, either sit down again or straighten the knees and stand.
Continuing Your Practice
After some practice, you should be able, with the aid of gravity, to execute Chair Pose in the traditional fashion. Enter from a standing position with your feet either separated a few inches or, for more of a challenge, mounded together.
Exhale and turn your palms out at the sides of your hips, then inhale and raise your arms overhead, fingertips tracing the rim of a large wheel whose hub is in your heart. Then, with an exhalation, release the heads of the femurs and allow the knees to bend.
In the final posture, the center line of the torso is just about perpendicular to the long axis of the femurs, so the hip joints make a right angle and the thighs are slightly above parallel to the floor (Figure 4). You may not be able to achieve this alignment immediately, but never mind—the outer form is not as important as the inner awareness. Hold the posture for 30 to 60 seconds, then inhale and return to standing, soaring up from the sit bones through the arms.
Finally, exhale and trace the rim of the wheel back down, feeling the arms rotating on the hub of the heart. The guru steers us from darkness into light, a word that can indicate both luminosity and weightlessness. Though gravity pulls on the mass of our bodies with a constant force we can measure and quantify on any bathroom scale, our subjective experience of its “attractive activity” is extremely elusive and fluid.
Slump in the chair you’re sitting in right now, back rounded, shoulders hunched, head thrust forward, femur heads lifted. Never mind what the scale reports: how much do you feel you weigh? Now drop the femur heads, lengthen the spine, and center the skull on the top vertebra, appropriately named the atlas. What about now?
When we’re aligned in the field of gravity, we have no sense of our weight; we are truly light. We can experience what B.K.S. Iyengar means when he states, “Alignment is the most important thing. Yoga is alignment.”


